Events Map View with Venue Directory attribute (requires add-on)
The title above might sound a bit confusing, but let me explain. The Events Map View add-on actually displays Venues with Events assigned to them. Put another way if a Venue doesn’t have an Event assigned the Venue will not show up in the Map View.
Some of our customers have asked if they can create a Venue Map. That would be a Map only showing Venues. A Venue could be businesses, companies, restaurants, movie theaters, gyms basically anything with a valid address that you want to show in the Map View.
Step 1
First you need to add the following attribute to use the Event Map View as a Business Directory
venue_directory: It takes an integer value of “1“.
venue_directory_terms: Type the slug(s) of the Venue(s) (parent), which is the parent(s) of all venues you want to show in the Business Directory.
You can also add any the following attributes. Remember only if you want to overwrite the default settings in the Options tab do you need to add an attribute.
gmap_zoom: It takes an integer value from “1” to “20“.
gmap_fullscreen: It takes an integer value of “0” or “1“. Using “1” will load the Map View in fullscreen automatically. Adding this attribute will overwrite the default settings in the Options tab.
gmap_geolocated: If you add latitude and longitude to the shortcode you should use the value “0” to disable the geolocation.
gmap_default_lat: Add the latitude coordinates for the location.
gmap_default_lng: Add the longitude coordinates for the location.
sidelist_template: It takes an integer value of “0” or “1“. By default the Sidelist with Events will show. Using “0” will hide the Sidelist tab.
icalendar: It takes an integer value of “0” or “1“. Using “0” will hide the ical button.
Step 2
Go to the Options > Event Map View tab and enable the Taxonomies you want to use as filters in the Business Directory
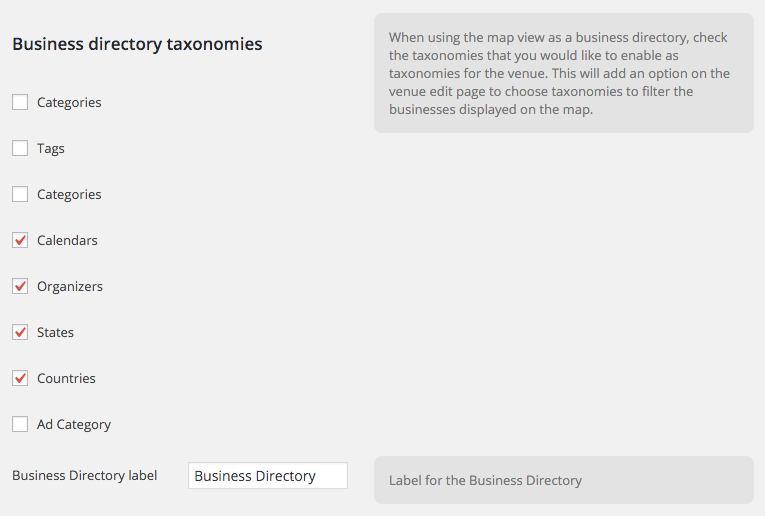
When you enable Taxonomies for the Business Directory the Taxonomies will show up in the Venue edit page. This way you can assign different Taxonomies to your Venues.
Step 3
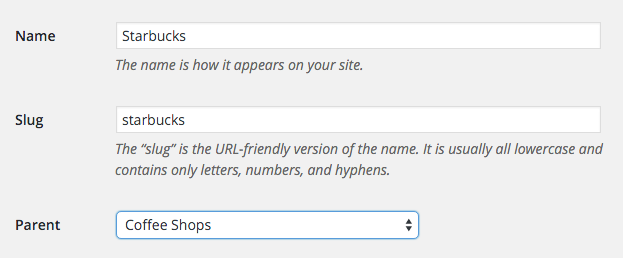
Create your Venue and select a Parent (venue_directory_terms). This is important as this is the terms, which will show in the Business Directory.
In the example below I’ve created a Venue called Starbucks and selected a Parent (venue) named Coffee Shops (slug: coffee-shops), which is one of the venue_directory_terms in the shortcode.
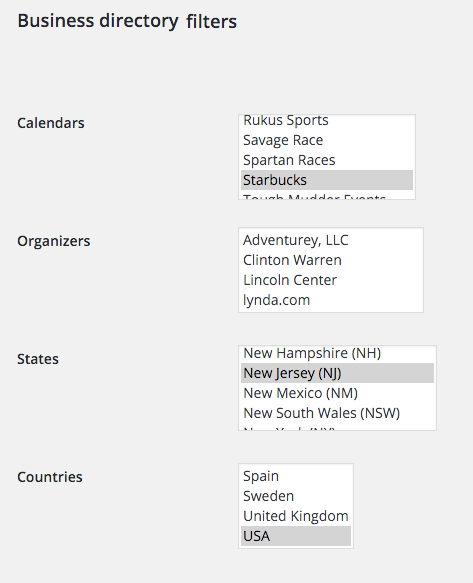
Add your Venue to the Business Directory Taxonomies. These will be the filters.
When you create your Venue or edit an existing Venue you will see a section similar to this below. As you can see the four Taxonomies we enabled in Step 2 are showing.
Now all you need to do is make sure the correct attributes has been added to your Calendarize it! shortcode. In this example we have added the attributes shown below.
You do not need to add the same. We have added the Latitude and Longitude and disabled the geolocation to make the Map View load with Hoboken, NJ as the center of the map.
[calendarizeit defaultview="rhc_gmap" gmap_zoom="13" gmap_geolocated="0" gmap_default_lat="40.74140445472766" gmap_default_lng="-74.01592254638672" venue_directory="1" venue_directory_terms="coffee-shops,mexican-food,bakeries" feed="0" sidelist_template="0" header_left="" header_center="title" header_right=""]
Please notice that you do not need to add the header_left, header_center and header_right unless you want to customize the navigation. By default the shorcode has the rhc_gmap, which will show the Map. However by adding the three attributes you can customize the navigation to your liking.